Chili

There’s a recipe over at AllRecipes.com called Chili By George!  It has been made over 3,000 times on the site.  It’s simple, but a perfect base.  You can add and change and tweak according to your preferences.  I’ve been making different versions of it for nearly 10 years and here’s my favorite.  It’s also featured in my Freezer Cooking post and freezes excellently for quick meals later.

2 lbs ground beef (either lean or drained)
200g onions, diced
100g bell pepper
1 tbsp. minced garlic
1 can chili beans
1 can diced tomatoes
1 small can diced green chiles
1 can tomato paste
Seasonings (these are suggestions…if you’re a comfortable cook, get wild with em…if you need a smart place to start, use these.  I often follow this, cook a few minutes, then add this much of everything except the sugar and chili powder all over again)
1/8 tsp cayenne
1/2 tsp sugar
1/2 tsp oregano
1 tsp salt
1.5 tsp cumin
1/4 C chili powder
1/2 tsp smoked paprika

In large pot, brown beef with onions, garlic and peppers.  Drain grease.  Add everything else.  Mix well and let simmer.  I usually add a couple of cups of water at this stage.  It will still be really thick.  Add more water to reach desired consistency.  The longer it simmers, the better it is.

chili

Divide into 8 servings immediately.  As written, the nutritional info is: 280 cal, 10f, 21c, 28p.  It’s hearty and delicious.  Feel free to tweak to your specifications.  It’s fantastic topped with plain greek yogurt (or sour cream) and shredded cheese.

Mega thanks to George!  http://allrecipes.com/recipe/14985/its-chili-by-george/

Chicken Teriyaki

The first time I used this in a freezer meal session, it was a total risk because I hadn’t ever made it before.  It was the only recipe in that batch that was an unknown.  It turned out to be the most pleasant surprise!  We LOVED it.  This appears in the Freezer Meals post, but here’s the stand alone recipe for you to try if you’re not up for a surprise.  🙂

2 lbs boneless, skinless chicken breasts, diced (would be awesome with thighs too)
1 bag of frozen vegetables (mine was 15oz and broccoli-based)
1/2 C honey (you can afford to use less if you’re worried about the carbs)
1/2 low sodium soy sauce or coconut aminos
1/4 C red wine vinegar
100g diced onion
some minced garlic (1 tbsp.? maybe)
1 inch peeled and minced ginger root.  Or be lazy like me and use 1tbsp of this stuff: http://www.gourmetgarden.com/en/product/104/ginger-stir-paste  From produce section.
1/4 tsp black pepper

For prep, you have a couple of options for this one:
throw everything in a crockpot and set on low for 6-8 hours or high for 3-4 OR
make on the stovetop.

I’ve made it both ways.  For the stovetop, add 1/2 tbsp. olive oil or butter to a skillet.  Add garlic and onions.  Cook until onions are translucent.  Add diced chicken.  When chicken is nearly finished, throw in the rest of the ingredients.  Cook until veggies are tender and chicken is cooked through.

Divide into 4 servings immediately.  Macros come out to 374 cal, 9f, 27c, 48p.

We eat it as-is, but it’s also awesome with cauliflower rice like this: http://cookeatpaleo.com/how-to-make-cauliflower-rice/

Thanks to New Leaf Wellness for the original recipe:  http://newleafwellness.biz/2014/10/20/6-healthy-freezer-crockpot-meals-50-minutes/

Taco Soup

My friends joke about how much soup I make and how much I love it.  It’s kinda my thing.  🙂  So don’t be surprised when this blog starts looking like a database of awesome soups…it’s going to happen!  Today’s is my momma’s Taco Soup.  It also appears in the Freezer Cooking post from yesterday, but I wanted to give you the recipe on its own so you can try it before you commit to having a bunch in your freezer.  So, here goes:

2 lbs ground beef (either buy super lean or drain the fat off the less lean cuts)
1 can chili beans
1 can corn, drained
1 can diced green chiles
1 can diced tomatoes (I prefer the ones without added salt)
1 can tomato paste
1 tbsp minced garlic
200g diced onion
100g diced peppers
chopped cilantro
1/2 packet of dry ranch mix (or make your own here: http://www.gimmesomeoven.com/homemade-ranch-seasoning-mix/)
1 packet of taco seasoning (I prefer homemade like this one:  http://www.smells-like-home.com/2011/06/diy-taco-seasoning/  Only tweaks: use smoked paprika if you can find it and skip the directions about corn starch…you don’t need that junk)

(Feel free to add more seasonings to taste.  It’s also just fine as written w/ taco seasoning and ranch mix.  If I added one thing, it would be smoked paprika)

Alright, first add ground beef, minced garlic, diced onions and peppers to a soup pot.  When the meat is browned, add 1 C water, the taco and ranch seasonings and mix well.  Then add everything else.  It’ll be really thick.  I prefer it that way because it’s easy to store and freeze, but if you plan to eat it now, add water until it’s your desired consistency.  I usually add a couple of cups for the whole batch.

tacosoup1

This recipe makes 8 servings.  As always, divide them up now so your macros will be correct.  If you followed the recipe as posted, you can search MacroTools Taco Soup in MFP and use my numbers.  It comes out to 280 cal, 10f, 21c, 27p.

Once everyone is making their own taco seasoning, those carbs will come down some.  There are carby thickening agents (and a ton of sodium and other weird things) in the store-bought kind that are affecting the numbers.  I’m planning a seasoning post soon so we can stock your kitchen with healthier versions of the store-bought stuff.  Then we’ll update the macros in recipes like this.

Anyways, I hope you love the taco soup.  My family does.  If you make it, please leave a comment and tell me what you think!

Freezer Cooking

I hate rushing around in the evenings to get dinner ready, and even a good Sunday of meal prep isn’t enough for every night.  By far the EASIEST solution I’ve found has been to do a session of freezer cooking every couple of months to stock the fridge with healthy, easy, meals that are ready to roll.  I’ve done almost a half a dozen of these freezer meal prep sessions with different friends in different situations:  once as a class I took, once in a church kitchen with my entire family of in laws, a couple of times for or with friends who were having babies, and a time or two by myself.  Each time it gets easier and quicker to plan and execute.  I think I’ve worked most of the bugs out by now.  🙂

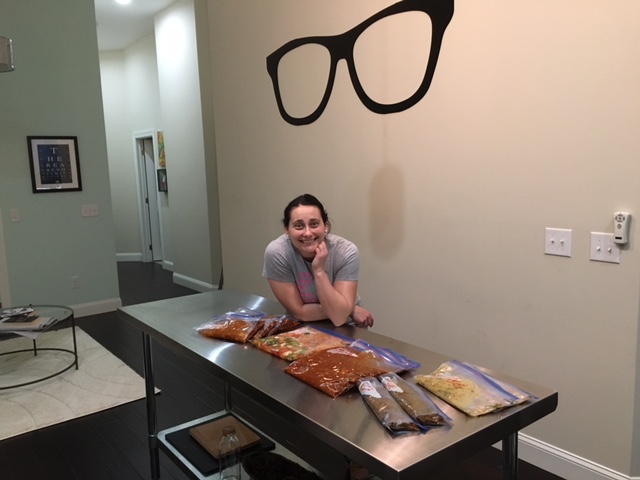
I HIGHLY recommend getting together with friends to do this.  Crank up the music and you’ll be finished before you know it and have a good time in the process.  Would make a GREAT date night w/ your accountability group…hint, hint.  This time I had the pleasure of helping my friend Meg put together her first batch of freezer meals.

Because she only needs a couple of servings at a time and she doesn’t know these recipes yet, we opted for just doing one batch of each.  If we were to repeat this after she tries and approves of all these recipes, I’d have her double the World’s Greatest Chicken, Chicken Teriyaki, and Burritos recipes.  But for now, we stuck with one batch a piece.

Here’s what we made:
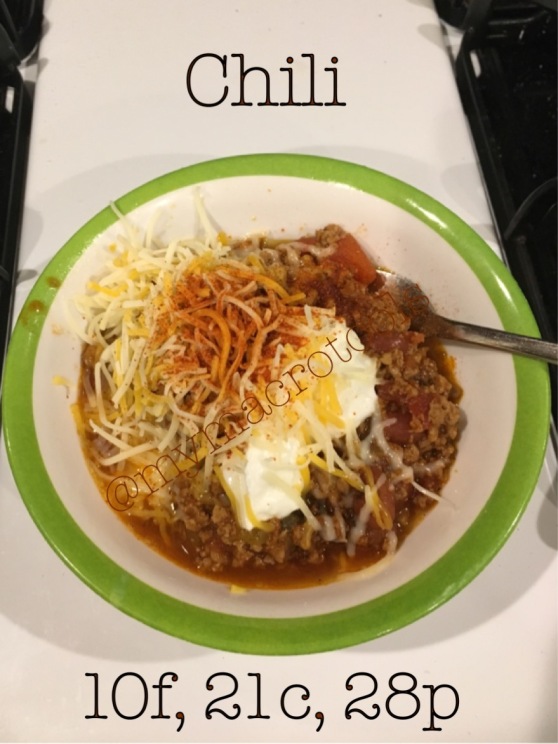
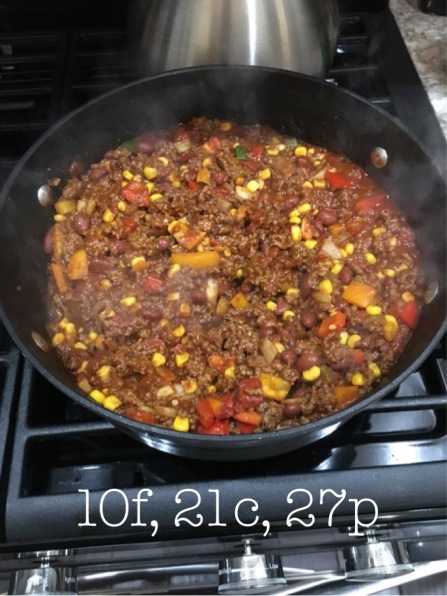
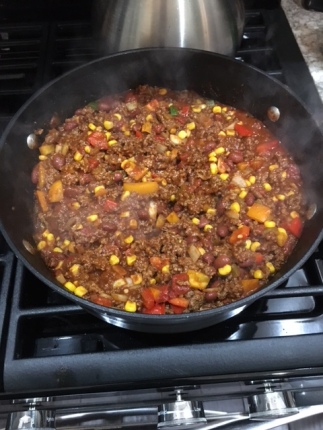
Chili 280 cal, 10f, 21c, 28p
Taco Soup  280 cal, 10f, 21c, 27p
Freezer-to-Microwave Burritos (also amazing as breakfast burritos, but that’s another post) EACH 166 cal, 7f, 19c, 17p when made w/ 1 tbsp each of cheese and salsa
Chicken Teriyaki 374 cal, 9f, 27c, 48p
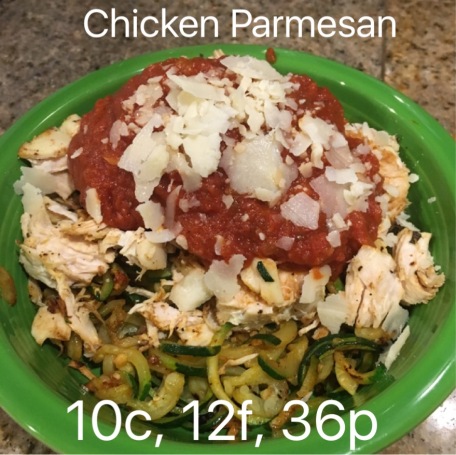
World’s Greatest Chicken (that’s what Pinterest says about it…it’s basically an amazing twist on dijon chicken)  298 cal, 7f, 16c, 45p
Taco Night JumpStart (basically the meat is ready to become nachos, tacos, taco salads, etc) 215 cal, 11f, 7c, 23p

For macro info, if you don’t want to have to log all this yourself in MFP, search MacroTools and the name of the recipe and you can use mine.  Ex.  MacroTools Chicken Teriyaki  And these macros will improve when you start making your own taco seasoning.  Also play with the amounts of maple syrup and honey to see if you can get away with less when you repeat these recipes (after you’re sure you like them as-written).

First things first, here’s the  shoppinglist.  It has all of the ingredients for each recipe.  The first two columns will be your shopping list: Ingredients and Totals.  They’re organized by department of the grocery store.  My first freezer meal experience had me chasing all over the store back and forth, over and over because they weren’t broken down like this.  Nearly killed the OCD in me. 😉  I think you’ll find these easier to follow.

When you’re ready to start, here’s the plan of execution:

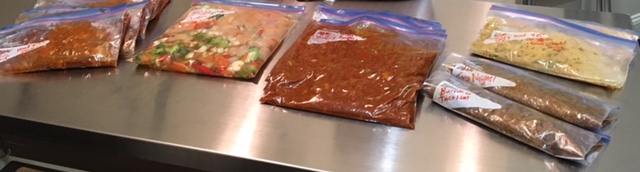
Label bags before you start.  Put today’s date on each bag in Sharpie.  I’m going to assume you need four servings/bag, so label them as such (feel free to divide more or less according to your needs):
Bag #1: World’s Greatest Chicken; Bake at 425 for 30ish mins or Grill
Bag #2: Chili; Add H2O
Bag #3:  Chili;  Add H2O
Bag #4:  Chicken Teriyaki; Sauté, Bake, or Grill
Bag #5:  Taco Soup; Add H2O
Bag #6: Taco Soup; Add H2O
Bag #7:  Taco Night!!!
Bag #8: Burritos; Remove foil, microwave 2-3 mins in plastic

Dice all onions and peppers.
Brown beef with onions and minced garlic.  Add 100g onions to each lb of beef.
Drain beef/onion/garlic mixture.
Divide beef/onion/garlic mixture into 3rds.  Put 1/3 in a pot for chili.
To chili pot, add:
1 can chili beans
100g diced onions
100g diced peppers
1 can tomato paste
1 can diced green chiles
1 can diced tomatoes (I prefer the type that have no salt added)
Seasonings (these are suggestions…if you’re a comfortable cook, get wild with em…if you need a smart place to start, use these)
1/8 tsp cayenne
1/2 tsp sugar
1/2 tsp oregano
1 tsp salt
1.5 tsp cumin
1/4 C chili powder
1/2 tsp smoked paprika

To beef left over (not in chili pot), add 1.5ish cups of water (you may need more) and 3 packets of taco seasoning (or make your own with this recipe http://www.smells-like-home.com/2011/06/diy-taco-seasoning/) to remaining 2/3 of beef.
Once the seasoning is mixed well, divide the taco meat into 4ths.  Put 1/4 in Bag #7.  Lay it flat (like a credit card) and squeeze all of the air out of the bag.  Place it in your fridge until the temp comes down, then move it to your freezer.  One bag down!  High five!
Put another 1/4 of the taco meat into a bowl and set it aside for burritos.

The remaining taco meat is your base for taco soup.  Add the following to it:
1 can chili beans
1 can corn, drained
1 can diced green chiles
1 can diced tomatoes (I prefer the ones without added salt)
1 can tomato paste
100g diced onion
100g diced peppers
chopped cilantro
1/2 packet of dry ranch mix (or make your own here: http://www.gimmesomeoven.com/homemade-ranch-seasoning-mix/)
(Feel free to add more seasonings to taste.  The ones you used in the chili will play well here if you want more heat.  It’s also just fine as written w/ taco seasoning and ranch mix.  If I added one thing, it would be the paprika)

While the Taco Soup and Chili are simmering, assemble the chicken bags.

Slice 2 lbs of chicken breasts into strips and add to bag #1
In a bowl, whisk together:
1/2 C dijon mustard
1/4 C maple syrup (not colored high fructose corn syrup…read your labels!)
1 tbsp. red wine vinegar
2-3 sprigs fresh rosemary (remove from stem and chop)
Add to Bag #1.  Smush chicken and dijon mixture together well to coat.  Lay flat.  Squeeze out air.  Seal and freeze.  Two Bags Down!

Dice 2 lbs of chicken breasts and add to bag #4
Add to it:
bag of frozen vegetables
1/2 C honey
1/2 low sodium soy sauce or coconut aminos
1/4 C red wine vinegar
100g diced onion
some minced garlic (1/2 tbsp.? maybe)
1 inch peeled and minced ginger root.  Or be lazy like me and use 1tbsp of this stuff: http://www.gourmetgarden.com/en/product/104/ginger-stir-paste  From produce section.
1/4 tsp black pepper
Smush to mix.  Lay flat.  Squeeze out air.  Seal and freeze.  Three Bags Down!

Make sure someone is stirring the Chili and Taco Soup.  You’ll notice they are VERY thick.  We’re making soup concentrates.  There’s no reason to add water to a recipe just to freeze it and have it take up more room in your freezer.  So you’ll add the water when you reheat these.  Don’t panic.  They’re supposed to be like this.  Add a little water if they need room to simmer, but don’t feel like either recipe should look/feel like the finished product.  They aren’t supposed to.

tacosoup

While those are simmering, assemble your burritos.  Here’s how they should look:
large square of foil
large square of plastic wrap
Ole tortilla
1/8 of taco mixture
salsa and cheese to taste
Roll it up in tortilla.  Roll inside plastic wrap.  Roll again in foil.
Repeat for all 8 burritos.  Add to bag.  Get as much air out as you can without squishing your burritos.  Lay flat in fridge until cooled.  Then add to freezer.  Four Bags Down!!!

The soups should be ready by now.  Check to see that onions and peppers are tender.  If so, bag em up!  Divide chili between bags 2 and 3 and taco soup between bags 5 and 6.  If you don’t have a friend to hold the bag while you fill it, put it in a pitcher with the top folded over (or a blender but only if you remove the blade first).  Lay flat.  Smush out air.  Cool in fridge then throw in freezer.  Bags 5-8 are now complete.

Pour yourself a beverage and put your feet up.  Dinner is (mostly) covered for at least 8 nights.  When you’re ready to use, just thaw in fridge the day before you want to use it then follow directions written on the bags.  Easy peasy.

food

Big thanks to the following spots for recipes/inspirations/spring boards:
Chili By George (3k people are using this recipe) http://allrecipes.com/recipe/14985/its-chili-by-George/
New Leaf Wellness for the killer Chicken Teriyaki  http://newleafwellness.biz/2014/10/20/6-healthy-freezer-crockpot-meals-50-minutes/
World’s Best Chicken http://rachelschultz.com/2012/07/11/worlds-best-chicken/
Taco Soup recipe courtesy of my momma ❤

Chicken Parmesan

This meal is so simple, it hardly feels like a “recipe,” but it’s also one of the most delicious things I’ve eaten recently, so I definitely wanted to share.

chickenparm

1 serving.  Feel free to multiply.
150g spiralized zucchini (if you don’t have a spiral slicer yet, get this one! http://inspiralized.com/shop/  I bought another brand and returned it because it didn’t stay suctioned to the counter.  This one has been flawless.)
165g boneless, skinless chicken breast (I batched cooked these on Sunday to use in recipes through the week.  If you don’t have a prep strategy you like for chicken in bulk, try this one: http://www.gimmesomeoven.com/baked-chicken-breast/)
1/2 tbsp butter
1/2 tbsp minced garlic
1/4 c spaghetti sauce (I used Sam’s Club Roasted Garlic & Tomato…use whatever makes you happy)
1/2 tbsp shredded parmesan cheese

Add butter and garlic to skillet.  Once melted, add zucchini noodles and cooked chicken (just to reheat).  When zoodles are tender, add sauce to heat.  Top with parmesan cheese.  1 serving and probably a five minute time commitment if you spiralize noodles at the start of the week and have your chicken ready to roll.

You can adjust the amount of chicken (or noodles or sauce) to hit your macro goals.  The recipe as is comes out to: 283 calories, 10c, 12f, 36p.  Can’t be sad about that.  🙂

Pork Chow Mein

Here’s lunch!

This originated from the Little Bits Of blog.  You can find the recipe here:  http://littlebitsof.com/2014/10/spaghetti-squash-chow-mein/  I added protein and cut back the sugar.  Here’s my take:

2.75 lbs pork sirloin grillers–You could use any cut of pork or sub out a different protein.  I had these on hand hoping to grill them as pork chops last week, and it didn’t happen.  So I threw them into my pressure cooker with some Dale’s Reduced Sodium Seasoning and a little garlic and butter.
1 spaghetti squash
100g onion, diced
168g (about 3 stalks) celery, chopped
1 tbsp. minced garlic
2 tsp olive oil
80g shredded red cabbage (bought mine in a bag and had some left over from making Broth Bowls earlier in the week)
250g cole slaw mix (also left over from Broth Bowls)
1 tsp brown sugar
1/4 c soy sauce or coconut aminos
1 tbsp. ginger (I use this kind because it keeps well http://www.gourmetgarden.com/en/product/104/ginger-stir-paste)
water (optional, I ended up using 2 c)
pepper to taste

Cook spaghetti squash.  (This can be done in the microwave, oven, or pressure cooker.  The microwave is the easiest if you’re just starting out with spaghetti squashes.  Puncture with a knife 10-12 times.  Place in microwave (on a plate because it can get messy)  Cook 12 minutes then let it sit for 10 minutes.  Times may vary by size.)  Cut in half, remove seeds and goop.  Shred into noodles with a fork.  If you’ve never done this before, you’ll be amazed.  It’s the coolest.
Cook pork sirloin grillers and shred with forks.  (Grill, bake, slow cook, pressure cook, whatever makes you happy)
I did both of these steps on Sunday during my meal prep extravaganza, so throwing dinner together was no big deal.

In a large skillet, heat olive oil, garlic, onions and celery.  Cook until onions are translucent and celery begins to soften.  Add red cabbage, cole slaw mix, brown sugar, soy sauce/coconut aminos, ginger and pepper.  Combine and sauté until veggies are soft.  Then add spaghetti squash noodles and shredded pork.  At this point, mine needed some water to combine well, so I added 2 cups.  If yours mixes well, feel free to omit that step.  Mix well and divide into 9 servings.

It’s really simple with a little prep done ahead of time and neither the pork nor the spaghetti squash require much effort to prepare.

The nutrition info comes to: 245 calories, 9f, 14c, 28p if you make it as-is.  Without the pork (in case you want to add your own/different protein), it comes to: 62 calories, 1f, 11 c, 2 protein.

porkchowmein

Protein Cheesecake

Last week, we all ate all the chicken and all the eggs.  Maybe all of them in the Tri-State area.  I think my family went through five dozen eggs last week.  No lie.  So when planning for breakfast for this week, I knew I wanted something a little less…eggy.  🙂  Enter: Protein Cheesecake.

This recipe comes from BuiltLean.com and it’s amazing.  Here’s the original:  http://www.builtlean.com/2013/01/23/protein-cheesecake-recipe/

For my version, I used greek yogurt cream cheese for extra protein, skipped the Stevia because vanilla protein power is already sweet enough for me.  I also bumped up the protein powder to 2 cups instead of 1.5.  I used what I had on hand which was MyProtein Whey Isolate, found here: http://us.myprotein.com/sports-nutrition/impact-whey-isolate/10852482.html  I can’t swear it’s any better than any others.  It’s just what I had left.  I really only use vanilla in baking.  I’m a chocolate shake kind of girl.

proteincheesecake

So, here’s my version:

  • 12oz Greek Yogurt Cream Cheese (I used Green Mountain Farms)
  • 10oz Plain Nonfat Greek Yogurt
  • 2 Whole Eggs
  • ¼ Cup 2% Milk
  • 2 Scoops Whey Protein
  • 1tsp Vanilla Extract
  • Dash Salt
  1. Preheat oven to 325.
  2. Soften cream cheese by pressing into the side of the bowl.
  3. Add eggs and mix together (I used a handheld mixer)
  4. Add everything else and blend at least 3 minutes
  5. Pour into greased pan
  6. Bake at 325 for 25 minutes THEN TURN TEMP DOWN TO 200 and bake another hour
  7. Slice into 8 servings

When I put the recipe into MFP, the macros were 252 calories, 7f, 10c, 23p for 1/8 of the cheesecake.  I wasn’t upset with that at all.  So, here’s to cheesecake for breakfast!  If you can afford the carbs, it’s pretty great with some fresh fruit and whipped cream on top.

If you have a fancy springform pan, I’m sure this would be gorgeous.  Try it out and share a pic!

If you make it, let me know how you liked it and your favorite way to top protein cheesecake!


Chicken Tortilla Soup

1 can (10 oz) enchilada sauce
1 can (10 oz) corn
1 can (10 oz) diced tomatoes (I used no salt added), with juice
1 can (10 oz) dark red kidney beans, drained
1 can (4 oz) diced green chiles
2 tbsp lime juice
950 g boneless, skinless chicken breasts
1/2 dry ranch packet (I used homemade)
1 bunch cilantro, chopped
100 g diced onion
1/2 tbsp minced garlic
1/2 tbsp olive oil
4 chicken bouillon cubes
1 tsp cumin
1 tsp chili powder
1 c salsa (I used World Table Salsa Verde)
water (to desired consistency; I used about 2 cups)

7 servings.  31c, 6f, 32p

Add olive oil, bouillon cubes, garlic and onion to the bottom of a soup pot.  Brown until onions are translucent, stirring regularly.  Add everything else.  Cook until chicken is done.  Remove and shred, then return to soup.  Portion out into 7 containers.

Can be garnished with tortilla chips, shredded cheese, guacamole, or sour cream, just be sure to log those additions.

tortillasoup

Broth Bowl

I’m still not blogging.  I don’t have time for that.  But, I fell hard for the Soba Bowl at Panera last night and was able to recreate a stellar version with WAY more favorable macros that I wanted to share with you.  So, here’s the plan:

1/2 diced onion (100g)
1/2 tbsp minced garlic
1/2 tbsp olive oil
100 g shredded cabbage (I used a cole slaw mix with cabbage and carrots)
100 g shredded red cabbage (also comes in a bag pre-shredded)
215 g slices white mushrooms
5 oz fresh baby spinach
4 chicken bouillon cubes
1 tsp sriracha
1 tsp brown sugar
2 tbsp soy sauce
3 tbsp miso (I used Minute to Miso because it’s what I could find)
240 g zucchini noodles (I use an Inspiralizer.  It’s super fast and easy.  http://inspiralized.com/shop/)
4 cups water

Throw olive oil, garlic, and onion in a pan and sauté until onions are translucent.  Add cabbage and onions.  Cook until tender.  Add everything else except the spinach and cook until noodles are tender.  Stir in spinach and cook until wilted.

Makes 4 servings.  Divide it out now to keep your macros straight.  Then you can add whatever protein you want to the top of each when you’re ready to serve.  If you want to add beef, just sub out the chicken bouillon cubes for beef ones.  I had chicken breasts that I had batch cooked at the beginning of the week, so I sliced one, heated it, and added it to the top.  That made my meal 13c, 9f, 49p, which makes me and my macros very happy.  Try it out.  I hope you’ll love it!


brothbowl

I’m not really blogging: Freezer Cooking Party, Round 1

One day, I’ll blog.  This is not that day.  lol.  I don’t have the time or mental real estate available to take on another project at the moment, BUT it is a good place to share info like this cooking adventure.  So, here you go!

We got together and cooked last night.  In case you want to replicate it, here’s the info.

In the end, you’ll have:
6 gallon-sized bags and 3 quart-sized bags of taco soup
4 batches of Italian Sausage w/ peppers and onions
6 batches of chicken teriyaki
6 batches of chile lime chicken fajitas
6 batches of Dijon chicken, aka World’s Best Chicken according to pinterest (and the original recipe)
40+ burritos that are ready to microwave-and-go
6-9 servings of taco meat to jump start Taco Night

I stuck to recipes I use all the time.  The only new one in this batch is the Chicken Teriyaki and it came highly recommended on the Pinterest.  I didn’t want to make 6 batches of a recipe only to find out it was a dud.  We may get more adventurous later, but for now, this seemed like the best bet.

As for price, everyone shops differently, but by using our own spices, olive oil, and making our own taco seasoning, we were able to pull this off for just over $300.  We did 2 shopping trips: one to Sams for meats, frozen veggies, spaghetti sauce, peppers, onions, and limes.  The other to Walmart for everything else.  We split the shopping responsibilities and they went really quickly.

Here are the Recipes.

And here’s the Shopping List.

The day of the cooking, here’s how to put it together:

  • FIRST THING–Dice 2 onions. Brown all meat with diced onions.  Once cooked, add taco seasoning.
  • Trim and butterfly chicken breasts.
  • Mix all marinades in bulk (ours were all 6x the original recipe except for the Italian sausage w/ peppers and onions…we only made 4 of those).  Then divide out among bags.
  • Slice onions and green peppers into fajita strips for fajitas and Italian sausage w/ peppers and onions.  Dice the rest of the onions.
  • Once taco meat is finished:
    Assemble taco soup in large kettle if you have one.  If not, dump canned beans and vegetables into individual bags.  Add taco meat.  DON’T cook the soup.  Just bag it up once everything is assembled.
    Make burritos.
    Any leftover taco meat will be bagged in 1-2 lb portions to be used for tacos, taco salads, etc.
  • For all other recipes, just dump ingredients in bags and remove as much air as possible.  Air = freezer burn = crappy tasting food.

We learned a few things along the way.  Here are some tips and tricks:
If you can, buy larger quantities (ex. 3 large cans of beans instead of 6 small cans).
Label bags before you fill them.
If you want to make your own taco seasoning, try this.  We love it.  http://www.smells-like-home.com/2011/06/diy-taco-seasoning/
Your own ranch mix, try this.  http://thecraftyblogstalker.com/smaller-portion-best-homemade-ranch/?showComment=1385332419483#c2584216732193509382

If you have any questions or comments, let me know.  We had fun with it.  I hope you will too!